

|
|
|
Project # 5 - Taming Your Fox Eagle .74
 |
Fox Eagle .74 Specifications
Bore: 1.00
Stroke: .937
Disp: .736
Weight: 19oz
RPM: 12,700 w 11-8
|
|
User Manual
Significant costs involved in machining the split crankcase used on the earlier Eagle II and III necessitated a change to maintain an acceptable profit margin. Thus, the Eagle IV series was born. This Eagle is a bit more conventional but still retains the separate cylinder casting.
Also new to this series was the
introduction of a .74 version. Both the .60 and .74 were once
offered in ringed and ABC versions. The .60 still is, but the
.74 is now only available with a ring due to significant running
and durability problems with the ABC version. Over-compression
still tends to be a problem, particularly in earlier Eagle IV
engines, and especially the .74. Since it's introduction the
.74 has seen at least five head button variations (that
we know of) in an attempt to tame handling but problems like
finicky needle settings and flameouts may still be experienced.
These engines also have a tendency to run too hot. In stock form
it is often best to limit the nitro content to 5%. Along with
the current head button, and perhaps a Fox Miracle Plug, this
may result in acceptable operation. Often, however, more is required
and you may consider some of the options that follow. We would
also recommend reading the information we have posted on the
Eagle .60 since
the .74 shares many of the same problems.
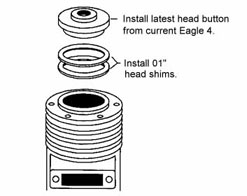
Install Current Head Button & Shims
Although the .74 does not respond to this quite as well as the
.60, some improvement may be realized by installing the latest
head button and, if necessary, further lowering the compression
by the addition of shims. Up to two .01" shims may be required.
Add shims one at a time and test run! (Shims are available from
Fox).
|
The number of shims required
depends upon such things as head button version, propeller size
and nitro content. The altitude of the flying site also plays
a part. The closer you are to sea level, the more head shims
are required. Engines operated at higher altitude sites may run
acceptably with no shims at all. We recommend adding no more
than two .01" shims. If too many shims are added power will
be significantly reduced and/or the engine may not be able to
attain a reliable two-stroke setting. As you try to lean the
needle it may just quit abruptly. Adding shims also has the undesirable
effect of moving the glow plug higher up in the combustion chamber
and, if carried too far, can again bring about unexpected "flame-outs".
Another side effect is the leaning
of the carburetor midrange. While improving MKX series carburetors,
this may also aggravate the already overly lean midrange exhibited
by some EZ series carburetors and result in additional new problems.
Some engines may require a combination of both head shims and
carburetor modifications to achieve satisfactory operation. |
|
A Custom Head Button
With the current .74, we also feel there is more to the problem
than just compression. The current head button has been opened
up to the point that the compression is actually lower than other
engines of similar displacement, yet the engine still "acts"
like the compression is too high. At first, this seemed to be
confirmed by the fact that adding a head shim, or two, often
improved the running qualities of the engine, however was not
as effective as in the .60 (which has a button of different configuration).
We found that the position of the glow plug is also much higher
up in the combustion chamber than is normally encountered in
engines of this size and suspected this contributed to the unfriendly
running qualities. So, after much experimentation, we developed
our own head button which we feel is quite successful and really
smartens up the .74. It was optimized for 10% nitro at sea level
since these were the operating parameters of interest to us.
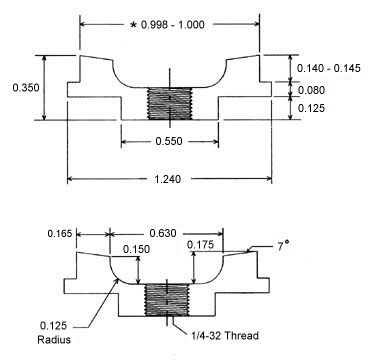
If you posses the necessary machinery and skills you can make
one for yourself from the drawing below. If you don't, and would
still like to try a custom button, we have a recommended source
for
custom machine work.
NOTE: This is
not just a modification to the stock button, it is made from
scratch. Additional shims may or may not be required depending
upon your particular operating conditions. Start without them. |
|
|
*
We have found that stock Fox buttons range from
about 0.994" to 0.998" For for best performance the
button should slip into the liner with a light press fit. We
usually custom fit the button to the particular liner it will
be used in. |
|
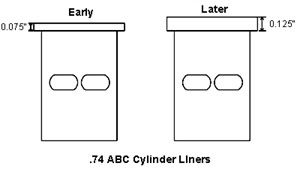
Important
Note: Early .74 "ABC" Engines Only!
The very first production run of .74 ABC engines contained cylinder
liners and head buttons that differed from all subsequent runs.
Since the flange on the cylinder liner was much thinner than
later versions, current model head buttons are not compatible.
They may contact the piston! Early liners can be identified by
measuring the flange as indicated in the following diagram. You
may still try adding head shims using the original head button,
however we recommend upgrading to the latest (ringed) piston
and liner as well as installing a current head button.
|
|
|
Carburetor Related Problems:
On engines equipped with an EZ series carburetor an overly lean
upper-midrange often contributes to flameouts and hot running.
Many engines are prematurely "cooked" because of this!
Please read our page on EZ series carburetors
and note the barrel modification. The .74 often requires this
modification to run well. The head button problem combined with
the carburetor problem can result in a very unfriendly
engine! If you do not wish to attempt the modification, install
an earlier Fox MKX series carburetor, or a Perry. |
|
Head Clamp Modification:
Another
little modification we like to do involves machining the surface
of the head clamp where it contacts the head button. The head
clamp casting tends to be quite rough and/or porous which reduces
the surface area contacting the head button. We have seen quite
a number of engines with a layer of baked on castor in between
the top of the head button and the head clamp. Machining this
surface allows full contact to further aid cooling. Although
only a very small amount of material will be removed, we also
recommend removing an equal amount from the bottom of the head
clamp. This will ensure that the head clamp does not contact
the cylinder casting before the head button is properly secured.
For information on sources for custom
machine work click here. |
|
Some recent problems:
There are new problems
showing up in more recent engines. These are related to a combination
of the EZ carburetor and a modification to the crankcase. The
crankcase has been modified internally to include a thin slot
that runs between the carb. intake and front bearing. The intent
was for the intake vacuum to prevent fuel from leaking past the
front bearing while the engine is running. Unfortunately, in
some cases, too much air is also drawn in through the slot upsetting
the mixture. (This is basically an air leak!). The air-bleed
EZ series carburetor may not have the adjustment range
to compensate for this, resulting in the inability to achieve
a proper mixture adjustment. Often the engine will run poorly
in the low to mid-throttle range although some engines suck in
enough air that they run poorly over the entire throttle range.
The engine need not be disassembled to check for the presence of
the slot, just remove the carburetor and the end of the slot is visible as shown in this photo . We have
been filling the slot with JB weld to fix the air leak problem,
but this must be done carefully so that the operation of the
crankshaft is not impeded. The engine must be disassembled, then remove the front bearing and clean
the crankcase thoroughly with solvent. Carefully fill the slot
(using a toothpick, etc.) trying not to get too much excess.
Allow the JB weld to set for a while, but not fully cure, then
insert the crankshaft. The front edge of the crankshaft will
neatly scrape away the excess JB weld for a perfect fit. Allow
the JB weld to cure fully before installing the front bearing
and re-assembling the engine.
An Important Final Note:
It is important that your engine still be in good condition before
employing any of these modifications. The tendency to run hot
can result in an engine that is ruined in very few flights as
the frustrated pilot tries over and over again to get a complete
flight without a flameout. Your Eagle .74 should have strong,
snappy, compression when you flip it over. If this is no longer
the case, you will likely need a rebuild first. The custom head
button, or shims, cannot be expected to cure a worn or damaged
engine.

If you have questions related to
your Eagle .74 you can use our
contact form
|
|
|