

|
|
|
Project #4 - Getting the best from your Fox .40
|
Specifications for Fox .40
Bore: .840
Stroke: .715
Disp: .396
Weight: 9.5oz
RPM: 12,800 w 10-6
ABC, BB and Bushing models all have same specs
|
|
User Manual for engines with MKX carburetor
User Manual for engines with EZ carburetor
Evolution History of the C-Frame .40
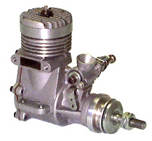
Introduced in the mid-80's, this "C-frame" series engine has its origins the .36 combat
U-control engine. The .36 crankcase was modified to accept a
muffler, and lengthened to allow the installation of a carburetor.
With the addition of a new carburetor designed to fit the unusual
square intake stack, the compact C-frame series was born.
Original "Compact Series"
engines were introduced with a single rear main ball bearing.
The front of the crankshaft ran directly in the aluminum casting.
Durability problems quickly became evident with this configuration
and a ball bearing was soon added to the front as well. (The
current .40 sport bushing version incorporates a sturdy bronze
bushing and has no such durability problems.)
Engines in this series originally
included the compact .29, .36, and .40 bushing series, as well
as the .40BB standard and .40BB Deluxe. Bushing and standard
BB models all use steel liners and mehanite pistons, while the
deluxe version employs ABC technology. The .29 and .36 sizes
are no longer produced, but during their relatively short production
period exhibited few running problems. The .40 size engines in
this series continue to be produced and we will address some
problems that have occurred with these. Test reports on early
models praised the high power, excellent idle and friendly running
qualities of this engine series (.40 size) and our experience
confirms this. Some later examples, however, proved to be much
less user friendly.
Although they have remained virtually
unchanged in external appearance, over the years internal changes
have been made which significantly affected performance and handling
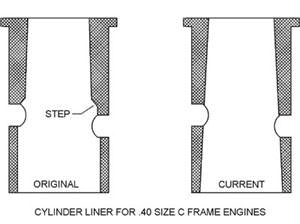
qualities. The single greatest change involved the design of
the cylinder liner. Very early examples, including ABC types,
employed cylinders that were not continuously tapered as you
might expect in a non-ringed design, rather they were abruptly
"stepped" down .002" in diameter just above the
exhaust port. Only the upper portion of the cylinder was slightly
tapered. Later models employed cylinder liners with a more conventional
constant taper. The diagram below is exaggerated to better illustrate
this:
|
Since the fit was critical, and
the original stepped ABC liner proved difficult to hone after
being chrome plated, pistons were individually precision ground
to fit each liner. Obviously, it was difficult to keep production
costs down with this approach. The conventional configuration,
however, apparently allowed more latitude in fit. Now with minimal
liner honing, and only a few standard piston sizes, a good fit
was quickly achieved. Those models employing steel liners were
likely also changed to keep production procedures consistent,
but it seems only Duke really knew for sure. Unfortunately, this
change also negatively affected performance and running qualities.
(Particularly the ABC version). Needle valves became more difficult
to adjust, and engines were prone to quitting, particularly when
operating in the midrange. Intolerance to nitro was another symptom,
and anything over 5% often aggravated the problem. Maximum rpm
was also reduced noticeably. Older versions, including bushing
models, often turned a 10X6 propeller at 14,000 rpm, while many
later examples ran closer to 13,000 rpm. (In fairness, it should
be noted that Fox only ever claimed 13,000 for these engines,
which is still very good performance.)
Perhaps the most significant
of these problems was the tendency to quit when operating in
the lower mid-range. After only a few minutes running at about
half throttle or less, the engine would quit when the throttle
was advanced, and no amount of adjusting could eliminate this.
Since the original MKX carburetor was slightly rich in the midrange,
it allowed the crankcase to slowly load up with fuel. When the
throttle was advanced, the excess fuel simply put out the plug.
Unlike earlier versions, these engines had become quite sensitive
to the fuel mixture, and would quit rather than clear. While
the introduction of the EZ series carburetor offered some relief,
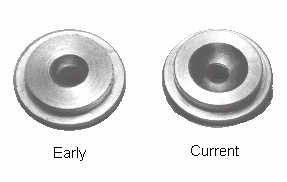
the problem was not entirely solved. Lowering the compression
provided further improvement and this was achieved with a new
head button design. The following picture illustrates the difference
between early and current model head buttons. |
|
|
The combination of the head button
modification, a modified piston and some fine tuning of the liner
taper, have substantially restored the running qualities displayed
by early versions. Previous carburetor woes can also be overcome
with the new "improved" two-needle design, however,
for some strange reason, Fox continues to supply the .40 with
the troublesome EZ series carb. The new two-needle carburetor
is available from Fox at the same price as the EZ series. Power
still lags slightly behind early models, but is still very good,
particularly when you consider the compact size and light weight
of this engine series. Even the economical bushing version easily
out-powers most imports of similar size and configuration
Some Solutions:
If you own one of the friendly early versions, and it is still
in good condition, treat it well and be sure to use fuel that
contains some castor oil. The original cylinder liner and piston
set are no longer available, so a rebuild will involve a new
series liner, piston and a new head button. One of the new improved
TN carburetors is also highly recommended. Ball bearing equipped
engines containing the original stepped liner can be identified
by the front of the crankshaft. On early versions the crankshaft
had eight small studs, and the thrust washer was keyed to fit
these. Later versions employ a taper locked thrust washer and
the crankshaft has no studs. Bushing engines, however, continue
to use the crankshaft with the studs so cannot be identified
in the same way.
If you own an "unfriendly"
engine that was built during the troublesome design transition
period, there are a number of possible options that provide a
solution, depending upon the cost and/or level of performance
you consider acceptable.
OPTION 1:
Our first recommendation is to upgrade
to the latest standards. Assuming the piston-liner fit is still
good, this is easily accomplished by just installing a new head
button and one of Fox's new improved
TN carburetors. This new carburetor (part # 2600) replaces
both the MKX and EZ series, and works very well.
OPTION 2:
If you are not overly concerned with
the somewhat rich midrange exhibited by some two needle MKX carburetors,
you may find that just installing the latest head button is an
acceptable second best option. Needle settings will be more friendly
and, while the engine may still stumble a little in the midrange,
it should no longer quit when the throttle is advanced.
If you like to experiment, an
MKX carburetor with an excessively rich midrange can be improved
somewhat by slightly enlarging the jet in the spray bar. Remove
the jet assembly from the carburetor, remove the high-speed needle,
then drill out the spray bar with a #55 drill.
NOTE: This modification is
for older .40 size "MKX" series carburetors only. Don't
try this on the new "improved" two-needle carburetor!
|
|
This modification allows the
idle mixture needle to be screwed farther into the jet to lean
the midrange without causing an overly lean idle. Because it
will now travel further into the jet, in some cases it is necessary
to shorten the idle mixture needle slightly to prevent it from
contacting the high-speed needle when the throttle barrel is
fully closed. This is accomplished by filing a small amount off
the tip.
OPTION 3:
The simplest, and least expensive solution
involves simply adding two .01" shims between the head button
and the top of the cylinder liner to reduce the compression.
While not as effective as the first two options, it may still
be acceptable, particularly if the nitro content in your fuel
does not exceed 10%. You can also apply the spray bar modification
shown in option 2 to further improve midrange performance, if
required. While not as effective as the first two options, it
may still be acceptable, particularly if the nitro content in
your fuel does not exceed 10%. You can also apply the spray bar
modification described in option 2 to further improve midrange
performance, if required. |
NOTE:
Many engines (particularly the ABC version)
were prematurely "cooked" as their owners tried in
vain to overcome the rich midrange, and flameout problem, by
setting the high-speed needle overly lean. Some earlier ABC engines
were also not fit properly. Before applying any of the suggested
improvement options check the piston-liner fit! (Project #6 Determining Engine Condition describes
how to check this). |
|
Carburetor Air Leak:
When first introduced,
the unusual square-neck carburetor was retained with a single
setscrew and sealed to the crankcase with RTV silicone. On later
engines a rubber gasket is used along with two setscrews. The
RTV method was a better method for sealing these carburetors.
The fit of the carburetor in the crankcase casting is often such
that tightening the setscrew/s tends to push the base of the
carburetor away from the crankcase. The very thin rubber gasket
provided may not seal properly. We have even encountered situations
where the carburetor will jam in the crankcase before it fully
seats against the gasket. The fit is quite variable! We recommend
deleting the gasket and applying silicone as done previously.
If the carburetor is not completely sealed to the crankcase,
the engine will run very poorly!
|
|
Some recent problems:
There have been new problems
showing up in more recent engines. These are related to a combination
of the EZ carburetor and a modification to the crankcase. The
crankcase has been modified internally to include a thin slot
that runs between the carb. intake and front bearing. The intent
was for the intake vacuum to prevent fuel from leaking past the
front bearing while the engine is running. Unfortunately, in
many cases, too much air is also drawn in through the slot upsetting
the mixture. (This is basically an air leak!). The air-bleed
EZ series carburetor often does not have the adjustment range
to compensate for this, resulting in the inability to achieve
a proper mixture adjustment.The engine may run poorly in the
low to mid-throttle range. Some engines suck in enough air that
they run poorly over the entire throttle range. The engine must
be disassembled to check for the presence of the slot. With the
crankshaft removed, look through the rear cover toward the front
bearing. You should be able to see the slot between the carb
intake hole and front bearing. We have been filling the slot
with JB weld to fix the air leak problem, but this must be done
carefully so that the operation of the crankshaft is not impeded.
Remove the front bearing and clean the crankcase thoroughly with
solvent. Carefully fill the slot (using a toothpick, etc.) trying
not to get too much excess. Allow the JB weld to set for a while,
but not fully cure, then insert the crankshaft. The front edge
of the crankshaft will neatly scrape away the excess JB weld
for a perfect fit. Allow the JB weld to cure fully before installing
the front bearing and re-assembling the engine.
Other Suggestions:
We recommend you read the page on EZ series
carburetors , if your engine is so equipped. There have been
some problems with these, apart from the slot/air-leak problem
described above. |
|