

|
|
|
Project #6 - Determine Engine Condition
|
No amount of adjusting and fiddling
will help an engine that is damaged, worn, or just plain "cooked"".
While external damage resulting from a crash is easy to spot,
internal problems can sometimes be difficult to diagnose, especially
for those who are not "engine people". Even a relatively
new engine with little running time may have suffered internal
damage if it was not operated correctly. Following are some simple
procedures you can perform to help determine the general condition
of your Fox engine.
NOTE: Certain procedures may
require engine disassembly. If you are not comfortable doing
this, try to enlist the help of someone in your club who is.
Most clubs will have at least one engine "expert".
Over the years Fox has produced an unusually large number of
engine models and variants. Early designs used steel liners exclusively,
and pistons made from either mehanite or aluminum. Some later
engines employed ABC technology, and more recently, even some
AAC versions were being produced for the U-control fraternity.
Because diagnosis techniques can vary depending upon the particular
piston/liner combination used, be certain you know which you
have. Following is a summary of the Fox engine models most commonly
seen:
Steel Liner with Lapped Mehanite Piston:
Related engines: All .15-.25,
Small frame .40 bushing and .40BB standard, Quickie .40 sport.
Steel Liner with Ringed Aluminum
Piston:
Related engines: .45, .50, Eagle
.60 and .74, older .40BB and .78.
ABC (Aluminum piston, chrome
plated brass liner)
Related engines: Quickie .40,
.40 Deluxe, .46 ABC, Eagle .60 and .74 ABC.
|
|
Varnish Formation and Removal
We rely on the oil added to our fuel to prevent the friction
that would otherwise result in quick destruction. Unfortunately,
the heat of combustion can cause chemical changes in the oil
resulting in the formation of a varnish-like substance on the
piston and cylinder. This is particularly true of castor oil.
The varnish can act as an insulator between the piston and liner
impeding proper heat transfer to the crankcase. A small formation
is normal in most engines and does not significantly affect operation,
but if the buildup becomes too great the engine will run hot
and performance, and general handling qualities, can degrade
significantly. Engines with EZ series carburetors (particularly
the .60 and .74), are very susceptible because an overly lean
midrange often caused them to run too hot.
To check for varnish buildup,
inspect the piston through the exhaust port while slowly turning
the crankshaft. Since the exhaust side of the piston runs the
hottest it will have the greatest buildup. A light brown formation
is typical in an engine that has some time on it and is of little
concern, but if the formation is very dark, even black, the buildup
is too great. In ABC engines the piston should be "scuffed"
free of varnish near the top indicating a good piston/liner fit.
(See section below on ABC fit). A dark buildup that covers the
piston to the top may indicate excessive wear in "ABC"
engines, but not necessarily in other types!
In most cases, engine performance
can be restored by simply removing the varnish buildup. This
will require disassembling the engine to remove the piston and
liner. (Unless it appears damaged, it is not necessary to remove
the connecting rod from the piston.)
You will find the greatest varnish
buildup on the exhaust side of the piston, while the top of the
piston will likely be covered with a dark layer of carbon. ABC
engines tend to form varnish mostly on the piston, while engines
with steel liners can form varnish on both piston and liner.
A few fine "apparent" scratches are also quite common,
and often go no further than the varnish layer. If deep score
marks are present, and/or the cylinder liner has areas that are
blue in color, (indicating extreme overheating), the piston,
liner and ring (if used) should be replaced.
Varnish and carbon formations
can be scrubbed off with a "non-metallic" scouring
pad and hot soapy water. We recommend 3M Scotchbrite® pads
as they will not cause damage even with vigorous scrubbing. Steel
wool is not recommended, and never use a wire brush, emery cloth
or any type of sandpaper! If the piston contains a ring (some
older models had two) remove it first. In severe cases you may
even find that the ring has seized in the groove. Heating in
an oven or with a heat gun will often free the ring. Do not use
a torch for this operation! You will find that lots of "elbow
grease" is required, but keep scrubbing until all the varnish
has been removed from both piston and liner.
Non-ABC engines may be re-assembled
at this point but always install a new ring (where used)! The
old ring cannot be counted on to seat properly again and you
will have a nice clean engine that runs worse than before!
If the engine is an ABC type,
before assembly check the piston-liner fit, as described below.
If the fit is poor do not continue to assemble the engine, it
will not run properly! Obtain a new piston and liner set.
Once the engine has been re-assembled
check for head leaks (as shown below) then treat it as you would
a new engine requiring some break in time. |
Determining Fit in ABC Engines
If the piston-liner fit is poor, ABC engines can exhibit a number
of frustrating problems including the inability to maintain a
good needle setting, sagging and even quitting suddenly in flight.
Even if the compression seems fine when flipping the engine over,
this does not always indicate a good piston-liner fit!
We have also seen seriously worn ABC engines that started easily
and would idle indefinitely, so these qualities do not necessarily
indicate that the engine is in good condition either. There are,
however, some things you can do that will help determine engine
condition. First, check for varnish buildup on the piston as
described above. The pattern of the varnish buildup can give
an indication of ABC engine condition.
|
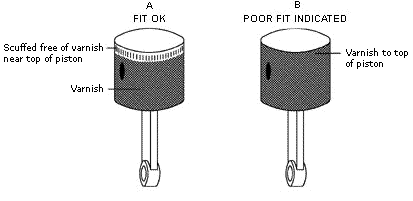
Varnish formation in "ABC"
engines can be an indicator of wear |
|
If the fit is good, the piston will
be scuffed free of varnish near the top due to the fit becoming
increasingly tighter as the piston travels up the tapered liner.
Over time, the fit will degrade allowing varnish to form all
the way to the top of the piston.
If the engine has not seen much
use (which doesn't mean it is in good condition), or you have
been using fuel that contains no castor oil (synthetic), there
may be little varnish buildup indicated. In this case, remove
the glow plug, then turn the engine over slowly. There should
be a noticeable "tightness" as the piston nears the
top of its stroke. The engine must be cold! If
there is considerable varnish buildup to the top of the piston,
or the fit does not become tighter at the top of the stroke,
disassemble the engine and clean the piston and liner thoroughly.
Next, apply a very thin coating of oil to the piston and
liner with your finger, and check the fit as indicated below:
|
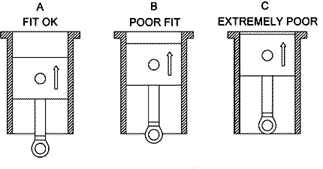
Spot at which the piston becomes tight
in liner - Fox ABC Engines
|
|
When inserted from the bottom
of the liner, the piston should begin to become tight as displayed
in A, indicating a good fit. If the fit is more like that in
B, you will find the high-speed needle becoming more finicky
to adjust. It will be difficult to find that "just right"
setting that is neither too rich or too lean. The engine may
also develop an appetite for glow plugs. The fit displayed in
C will result in a very unfriendly engine. While it may still
start easily and idle, finding a steady high-speed needle setting
will be almost impossible, and frequent flameout's may also occur,
particularly when operating in the midrange. The only remedy
for a poor fit is replacement of both piston and liner, which
come in matched sets. |
Compression
Check for head leaks, particularly if the engine has just been
re-assembled. This can be easily done with a small container
of water, as shown below. Make sure the glow plug is tight, and
do not allow water to enter the exhaust port or carburetor. Only
the head and top few cooling fins should be immersed! Slowly
turn the crankshaft through a complete revolution and watch carefully
for a small flow of air bubbles around the head. If a leak is
indicated, first try tightening the head screws then test again.
Older engines, with single piece heads, use an aluminum gasket,
which should be replaced if a good seal cannot be achieved. Note
that current Fox engines utilize a two piece head with a separate
head "button", and do not use a gasket.
|
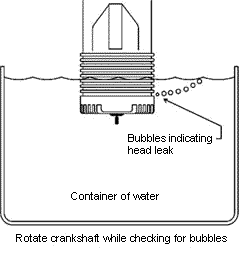
Checking for Head Leaks
|
|
Engines employing a separate
head button sometimes do not seal perfectly, even though there
is no apparent damage to the head button or the top of the liner.
This can often be cured by "lapping" the head button
into the top of the liner. Apply a mild abrasive, such as metal
polish, or automotive polishing compound (used to restore paint
finishes), between the head button and mating surface on the
liner "top flange". Press the head button firmly into
the liner and rotate back and forth a number of times. Be sure
to thoroughly clean all remnants of lapping compound from both
head button and liner before reassembly! Occasionally, even new
liners require "facing" to achieve a good seal. This
is easily accomplished by placing a sheet of #600 sandpaper (wet)
on a smooth glass surface, then carefully facing the top of the
flange using a swirling motion. Be sure to hold the liner square
to the glass/sandpaper. Only moderate pressure is required.
If a proper seal cannot be achieved
it is likely the top of the cylinder liner and/or the mating
surface on the head button has been damaged. This may happen
when poor engine service practices have been employed. A small
gouge from a pair of pliers or scratch from a screwdriver is
all it takes!
When you are satisfied the head
seals properly, place a few drops of light oil in the carburetor
and exhaust port, install a propeller, and flip the engine over
a number of times. Do not connect power to the glow plug, we
are not trying to start the engine! If there is "significant"
resistance as the piston nears the top of the stroke, and it
"snaps" smartly over the top, the compression is likely
acceptable in non-ABC engines. If this is not the case, it is
likely time for a new ring, and/or a piston-liner set.
Occasionally, just replacing
the ring will not restore compression even though the piston
and liner "seem" to be in good condition. If the engine
has accumulated considerable running time, liner wear and/or
wear on the lower edge of the ring groove can prevent a proper
compression seal. In this case, the piston and liner must be
replaced as well |
|
Bearings
Typically, the crankshaft runs in bearings that may consist of
either a bronze bushing or dual ball bearings, depending upon
engine model. An exception was the .29, .36 and .40 "Compact"
series which employed the unusual combination of a single rear
ball bearing and
aluminum front bushing (no bronze). This series suffered from
durability problems and was produced for only a short time.
Bronze Bushings
Bronze bushings are generally employed where price, and/or weight
are the main factors. The bushing is a permanent part of the
crankcase and is not replaceable. Some end-play (in and out)
is normal as is a "small" amount of side play. If the
crankshaft can be moved sideways significantly, the bushing is
excessively worn. The only remedy is to replace the crankcase,
however, bronze bushings are generally quite durable and usually
outlast the rest of the engine. For maximum bushing life avoid
the use of heavy spinner nuts that are intended for the purpose
of adding nose weight. Note: Bushed engines often have a "rattling"
sound when at idle. This is the normal result of end-play, and
does not mean the engine, or bushing, is worn out.
Ball Bearings
Upper engine models employ two ball bearings to support the crankshaft.
There should be very little end-play and virtually no side to
side crankshaft movement. With the engine still warm, the crankshaft
should rotate very freely with little sound. Swishing, scraping
or clicking sounds and rough spots, indicate worn or damaged
bearings. If the engine has been run on fuel containing only
synthetic oil, or it has been stored without after run oil, the
bearings should be inspected for rust formation. The front bearing
may be inspected by just removing the thrust washer while the
rear crankcase cover must be removed to view the rear bearing.
If rust is evident, replace the bearings.
If it has been stored for some
time and the crankshaft does not rotate freely, inspect the bearings
before running the engine. All of the ball bearings should rotate
freely in the bearing races. If they do not, it is often due
to thickened castor oil. The bearings should be flushed with
solvent until they are free. (It is not usually necessary to
remove the bearings from the crankcase) Do not expect them to
free up by just running the engine. Stuck ball bearings will
often "skate" in the bearing race and wear a flat spot
before becoming free! Hardened castor on bearings can be very
difficult to remove, and may require strong solvents such as
automotive carburetor cleaner etc.
It is particularly important
that the rear bearing be in good condition. A bad bearing can
come apart, sending metal bits through the engine. When this
happens, the engine is usually ruined instantly! |
|