|
OWNERS MANUAL FOR FOX 45, 50 AND QUICKEE MOTORS REVISED MARCH 1989 |
|
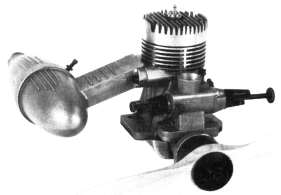
MESSAGE FROM DUKE FOX We are very proud of these motors and we want yours to give you the best possible service. Please read this Owners Manual in its entirety and follow our instructions to the best of your ability. If you have any questions not covered here, please feel free to call us at 501-646-1656 NOTE: The Fox 45 and Fox 50 differ in bore size. The crankcase, cylinder, piston, wrist pin, and head button are different for the two models. Other parts are the same. SUITABLE MODELS: These motors are suitable for radio control models calling for motor sizes from 35 thru 60. Helicopter versions are fitted with oversize heads and cranks that have the crankshaft shank ground to run true within .0005 TIR. |
|
WARNING: There is always the possibility you may lose control of your model. Do not fly in any location where your model might strike people or do property damage should this occur. |
|
INSTALLATION: Your Fox motor mounts in the normal manner. If your airplane calls for a firewall mount, we recommend one that is very rigid. If your plane is designed with a hardwood beam type mount, be sure they are well braced between the two beams, and the beams are gusseted to the firewall, and, preferably, to one another. Flimsy motor mounts will allow the engine to vibrate excessively and may damage the model and cause foaming of the fuel tank. Also, excessive vibration can cause glow plug failure. If a cowling is used, provisions should be made for both air inlet and outlet. PROPELLERS TO USE: We recommend you always use a hardwood propeller. The sizes shown are a good starting place. However, the essence of model building is experimentation. So as you feel like experimenting, try varying the pitch and diameter. |
| Large Model | Small Model | |
| Fox 45 | 11 x 5 | 10 x 6 |
| Fox 50 | 11 x 6 | 10 x 7 |
| Plastic propellers are not recommended because if you should accidentally get your hand in the propeller arc while running, you will be hurt a lot worse. Wood propellers will usually break before you are seriously hurt. |
|
WARNING: Always keep clear of the propeller. It is possible for a propeller to cut off a finger or for a piece to come off and put an eye out. |
|
Note: A die cast
spinner, back plate and screw are included with some models.
The spinner back plate is designed to replace the thrust washer.
Sometimes the thrust washer sticks rather tightly on the taper
lock. In this case, removal is accomplished by wrapping the thrust
washer with two or three wraps of masking or similar tape. Then
holding the motor with pliers around the tape and rapping the
end of the crank with a wood block. FUEL TO USE: Model airplane fuels are a mixture of methanol, oil and various additives to improve ignition, add power, and cut down carbon deposits. It is important to use only fuel with a minimum of 18% castor oil lubricant, otherwise, your engine life will be drastically reduced. Nitro is another fuel ingredient that is often used. Its function is to "advance the spark". To determine if you need any, or more nitro, start engine, open the throttle wide open and set your high speed needle for maximum power; then back it out slightly. Do all this with your booster battery connected. Now remove your booster leads - if your motor slows down, more nitro is indicated. Fox Gold Star (5% Nitro) and Dukes Fuel (10% Nitro) have castor oil lubricant and should work satisfactorily. |
|
WARNING: Model airplane fuel is both flammable and extremely poisonous. Use the same safety precautions you would use with a can of gasoline or a bottle of poison. |
|
GLOW PLUGS: This series motors all use the long thread glow plug. We recommend our Miracle Plug because it gives a more reliable idle. TO START YOUR MOTOR: 1. Mount your motor securely on a mount that does not put a strain on the mounting leg. #4-40 screws are the size to use. The fuel supply should be so positioned that the fuel level is no more than 1/2" above or below the fuel nipple. The fuel line should not be higher than the fuel level at any point. Use Fox medium size fuel line. 2. Close the throttle - adjust the idle stop screw (the one on top), so you can see a hairline opening in the intake when the throttle is pushed closed. 3. Set the high speed needle 3/16" in from the end of the clips. 4. Set the low speed needle 1/16" in from the end of the clips. 5. Set the throttle at 1/3 open throttle position, connect the glow plug wire and crank counter clockwise with a quick, snappy, flipping motion. If it does not start in a few flips, try choking it a turn or two. It should start and run at these settings. NOTICE: It is possible to stretch the needle seat by screwing the low speed needle in too far; and then forcing the carburetor closed. This will result in a rich midrange that can be corrected only by replacing the jet assembly. |
|
WARNING:
A model airplane motor can get hot enough to cause a serious burn. Do not touch the motor right after it has been running. |
|
BREAK IN: Your Fox 45 or 50 has been test run at full power and should fly your airplane with no problem. The idle, however, will become more reliable as the motor accumulates running time. When you install the muffler, it is important that both set screws be tightened tight. A bit of locktite on the threads isn't a bad idea, either. |
|
WARNING: Never fly a control line model within 200 feet of power lines. Death by electrocution is possible if your model comes near a power line. Direct contact is not necessary. |
|
FINE TUNING YOUR MARK X CARBURETOR:
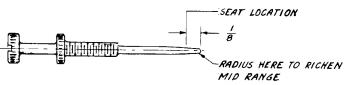
The most reliable settings are those in which the lower half of the throttle range is as lean as possible without stalling and becomes slightly rich in the 3/4 to the full throttle setting. Both needles screw in to lean and out to richen. For normal tank installations and flight conditions, we recommend that the low speed mixture adjustments be made for maximum RPM. The high speed is adjusted by screwing the high speed needle in until the motor obtains maximum RPM, then backing out until the motor slows down 200 RPM. If after your Fox motor is run in and you wish to alter the mixture contour, you can do so by working on the tip of the low speed needle. |
|
If the motor will not get rich enough at high
speed: File 1/64 or so off the end at a 45 degree angle. If the motor is lean at mid range: Sand a radius on the edge shown. If the mid range is rich, but can be made to work fine by screwing the needle in a bit too much for a good idle: Try sanding the seat location but avoid removing metal toward the tip. If you do mess up you have not ruined an expensive part: Try to get it working just exactly the way you want. Be Quiet - Don't aggravate the neighbors if you wish to continue enjoying your hobby. The muffler we supply reduces sound to an acceptable level for most rural flying fields. However, if there is any possibility that your model noise is aggravating someone, we suggest you add our hush kit. This consists of a secondary expansion chamber added in back of the regular muffler, and an extended nut to allow the use of two stacked propellers. WHEN THINGS DON'T GO SO WELL: Motor Won't Start - Bad Plug - Fuel Tank Empty - Fuel Line Collapsed, Leaky or Off - Weak or Dead Battery Motor Won't Keep Running with Glow Plug Heater Removed - Insufficient Nitro for Weather - Bad Plug - Or Plug Carboned up by Inferior Fuel - Too Rich a Setting - Water in Fuel Motor Goes Lean and Quits after a Couple Minutes Running - Hole in Flopper tube in Tank - Too Lean a Carburetor Setting Glow Plug Burns Out Every Flight - Over Voltage - Should Glow Orange and Not White - Excessive Vibration - Loose Motor Mount or Unbalanced Spinner, or Plastic Propeller Flexing - Crumpled Glow Plug Element - By Cranking with a Flood in Case. IN CASE OF CRASH, DO NOT TURN THE PROP OVER YET! First - Remove from rest of model Second - Wash under hot water faucet Third - remove plug and rear cover and wash in stoddard solvent Fourth - Now check and if it turns over freely, it is probably not hurt. OTHERWISE, PROCEED TO DISASSEMBLE: To disassemble - remove the head, rear cover and carburetor. Lift out the cylinder liner, next slip the con rod off the crankpin The piston-rod-wrist pin assembly is not readily dis-assembled in a home shop and we recommend they be sent to us if work on these is required. Inspect all parts - discard any that appear damaged or worn. New parts can be obtained directly from the factory by calling (501) 646-1656 during business hours. When re-assembling, use care to get the oil hole in the rod facing the prop. If repairs are more than you want to handle and you desire us re rebuild it for you, mail directly to us. We will dis-assemble the motor, replace all necessary parts, test run and return the motor to you charges collect. It has not proven practical to make any sort of estimates. We will assure you, however, that our charges will never be more than 60 percent of the list price of a new motor. GOOD LUCK, AND ENJOY YOUR FOX MOTOR - IT IS ONE OF THE FINEST BUILT ANYWHERE. |