|
OWNERS MANUAL FOR THE FOX 19BB |
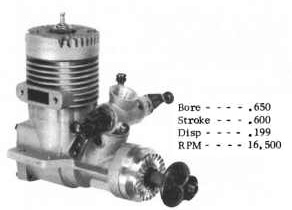
January 1, 1982
|
MESSAGE FROM DUKE FOX We are very proud of our Fox 19BB and want it to give you the best possible service. Please read the owners manual in its entirety and follow its instructions to the best of your ability. If you have any questions not covered here, please fell free to call us at Area Code 501-646-1656. NOTE: The Fox 19BB has a unique design feature of being able to turn the cylinder 90 degrees or 180 degrees from the standard side exhaust configuration, with no additional parts required. If you wish to have the exhaust in the rear or to the opposite side, just pull the four cylinder head bolts, turn the cylinder the way you wish, and install the cylinder head bolts. Be careful that the cylinder liner also turns with the cylinder casting, and that you do not get the ports out of position. Also be careful that you do not damage the thin gasket between the cylinder section and the case. SUITABLE MODELS The Fox 19BB is intended for all sport and scale type model airplanes that their size and weight would fit. They are suited to model helicopters if auxiliary cooling is provided. Your Fox 19BB also makes an excellent race car engine if a suitable heat sink is provided. Your Fox 19BB is also well suited to model boat use if a cool clamp is provided for the head. |
|
WARNING There is always the possibility you may lose control of your model. Do not fly in any location where your model might strike people or do property damage should this occur. |
|
INSTALLATION Your Fox 19BB mounts in the normal manner. If your airplane calls for a firewall mount we recommend the Fox #50203 one piece metal mount, as it is very rigid. If your airplane is designed with a hardwood beam mount, be sure they are well braced between the two beams and the beams are gusseted to the firewall, and preferably, one to the other. Flimsy motor mounts will allow the engine to vibrate excessively and may damage the model and cause foaming of the fuel tank. If a cowling is used, provision should be mode for both air inlet and outlet. PROPELLERS TO USE We recommend an 8" diameter, 4" or 5" pitch propeller for most models. We recommend hardwood propellers of maple, birch or cherry wood. We recommend you never use a metal, fiberglass, or nylon propeller on your airplane because they are more likely to cut off part of your hand should you have an accident. Your Fox 19BB will run satisfactorily on a 9" or 10" diameter propeller but the large venturi carburetor will have practically no suction, and to get satisfactory fuel draw the carburetor should be replaced with one having a smaller venturi. |
|
WARNING Always keep clear of the propeller. It is possible for a propeller to cut off a finger or for a piece to come off and put an eye out. |
|
FUEL TO USE Your Fox 19BB should run very well on no nitro fuel in warm weather. The no nitro fuel formula we recommend is castor oil - 20%, propylene oxide - 2%, methanol - 76%. In cool weather it may be necessary to go to a nitro fuel to prevent an RPM drop when the battery wire is removed. Dukes fuel is ideal and works better than many 10% mixes because it contains propylene oxide which helps in idling and a detergent which helps keep the carbon down.For rather spectacular performance you may want to try Fox Missile Mist fuel. |
|
WARNING Model airplane fuel is both flammable and extremely poisonous. Use the same safety precautions you would with a can of gasoline or a bottle of poison. |
|
GLOW PLUGS Your Fox 19BB should be fitted with Fox long thread glow plugs. For a good idle the idle bar type seems better, however, these motors work surprisingly well on the cheaper standard variety. TO START YOUR MOTOR 1. Mount your motor securely on a mount that does not
put a strain on the mounting lugs. #4-40 screws are the size
to use. The fuel supply should be so positioned so the fuel level
is no more than 1/2" above or below the fuel nipple. The
fuel line should not be higher than the fuel level at any point.
Use Fox medium silicone type fuel line. |
|
WARNING A model airplane motor can get hot enough to cause a serious burn. Do not touch the motor right after it has been running. |
|
BREAK IN No special break in is required. Go ahead and install it in your airplane and fly. We do recommend you keep your carburetor set slightly rich at all times. In the interest of good compression and long life we have fitted your motor as tight as we dare. In the event yours is fit too close and you have trouble with the piston seizing (engine stops abruptly on lean), continue to run the engine at full throttle with the high speed needle rich enough so that it doesn't want to quit for a couple of tanks of fuel, or until it will hold a full power setting. You should be aware, however, that it takes about 1 hour running time to full break in. For this period any motor is likely to stop at idle speed, and it is really futile to try to fine tune the idle until the motor has been run this amount of time. |
|
WARNING Never fly a control line model within 200 feet of power lines. Death by electrocution is possible if your model comes near a power line. Direct contact is not necessary. |
|
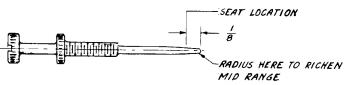
FINE TUNING YOUR FOX 19BB CARBURETOR The most reliable settings are those in which the lower 2/3 of the throttle range is as lean as possible without stalling and becoming slightly rich in the 3/4 to full throttle setting. The needle on the fuel nipple side is the high speed needle and controls the mixture in the wide open throttle position. The needle on the other side is the low speed needle and controls the mixture through idle and mid-range. Both screw in to lean and out to richen. For normal tank installations and flight conditions we recommend that the low speed mixture adjustments be made for maximum RPM. The high speed is adjusted by screwing the high speed needle in until the motor obtains maximum RPM, then backing out until the motor slows down 200 RPM. If, after your Fox 19BB is run in, you wish to alter the mixture contour, you can do so by working on the tip of the low speed needle. |
|
If the motor will not get rich enough at high speed:
If the motor is lean at midrange:
If the midrange can be made to work fine by screwing the needle in a bit too much for a good idle:
If you mess up you have not ruined an expensive part. Try to get it working exactly the way you want. NOTE: A lot of cases of the motor quitting in maneuvers can be corrected by shortening the flopper tube. We recommend you leave a 3/4" to 1" space between the back of your tank and the flopper tube weight. Many cases of excessive plug failure can be traced to power panels that do not work right. Unfortunately, there are power panels on the market that do not work as well as they are supposed to. If in doubt, resort to the hobby battery and see if this corrects the problem. WHEN THINGS DON'T GO SO WELL Motor Won't Start:
Motor Won't Keep Running with Glow Plug Heater Off:
Motor Goes Lean and Quits After a Couple Minutes Flying:
Glow Plug Burns Out Every Flight:
IN CASE OF CRASH, DO NOT TURN THE PROP OVER YET:
OTHERWISE, CONTINUE TO DISASSEMBLE TO CONTINUE DISASSEMBLY: Remove head screws, lift off head, head button and cylinder assembly. Remove crankcase screws and remove rear cover. Slide off the connecting rod. After removing the thrust washer you can drive the crank back out with a wood or plastic mallet. REASSEMBLY: Reassembly is straightforward but be sure the wrist pin snaps rings or seated in the piston groove and are tight. It is easy to squeeze the snap ring too much in disassembly and when re-installed it is not tight. If in doubt, stretch the snap ring. FACTORY SERVICE: We want your Fox engine to perform well for you. Technical advice can be obtained by phoning Area Code 501-646-1656. If your motor has become worn or crashed and you desire our factory repair service, mail it directly to us. We will disassemble the motor, replace all necessary parts, test run and return the motor to you charges collect. It has not proven practical to make any sort of estimates. We will assure you, however, that our charges will never be more than 60% of the list price of a new motor. |
GOOD LUCK AND ENJOY YOUR FOX MOTOR - IT IS ONE OF THE
BEST BUILT ANYWHERE